How to Use the Nonprofit Eligibility Manager
Note: This feature is only available on our Impact Plus and above plans, or if you have purchased the customer cause search feature a la carte
As a store owner, you have control over building a curated list of causes your shoppers can select from. To do this, you can visit the Nonprofit Eligibility section of our Cause Manager in the Impact Portal.
You can curate your causes in 2 ways:
- Add Inclusions - with this feature, you can curate your cause list so that shoppers can only support the causes you included in the list through the customer search feature. This method effectively excludes all other nonprofits from our database of 1.8M nonprofits which is why it is best used if you have a very specific list of nonprofits your business agrees to donate to.
- Add Exclusions - with this feature, you can choose to exclude very specific nonprofits so that they are not returned in your shopper's search results through the customer search feature. This method is used when you want most of the 1.8M nonprofits in our database available to your shoppers, but have a few that don't align with your business's impact goals.
To add nonprofits to the exclusion list...
1. Open the Impact Portal, then navigate to your Cause Manager by clicking on Causes from the left side menu, then selecting Nonprofit Eligibility: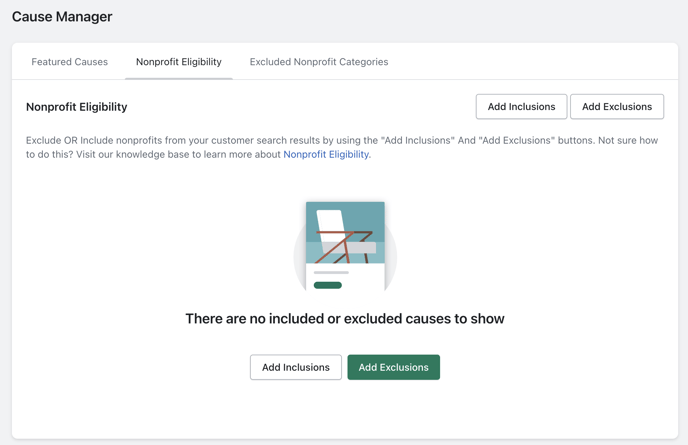
2. You can then use the Add Exclusions button to begin excluding the nonprofits you would like to remove:
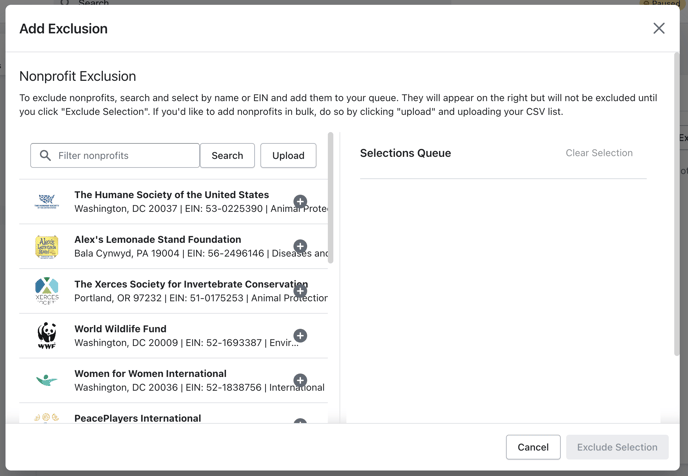
3. Search for the nonprofit you would like to exclude and add it to the exclusion list by clicking the + icon next to the desired nonprofit result.
The list on the right is a selection queue. Causes cannot be added to your exclusion list until you click the Exclude Selection button shown below:
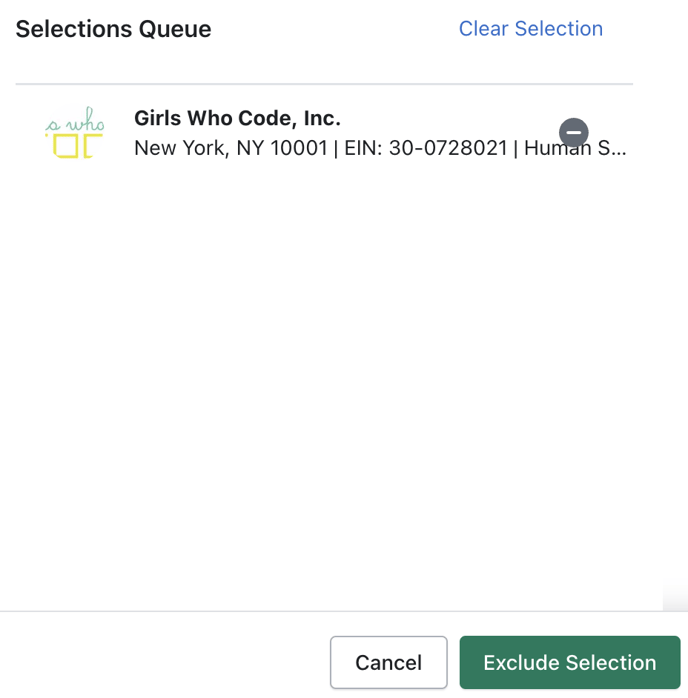
Once you've clicked Exclude Selection, you're all set! The causes you selected in the modal will be excluded from search results and cannot be supported by you or your shoppers.
Bulk-excluding nonprofits
We also give you the option to bulk-exclude nonprofits by clicking the Upload button to upload a CSV file of nonprofit EINs into our system.
- The CSV should contain a single column with the nonprofit EINs you'd like to exclude. One EIN per row, no headers on the column
Once you’ve uploaded the CSV, the causes that are in our database that you want to exclude will be visible on your screen.
You can also exclude nonprofit categories with our Exclude Nonprofit Category manager. To learn more, visit the Exclude Nonprofit Category knowledge base.
To add nonprofits to the inclusion list...
1. Open the Impact Portal, then navigate to your Cause Manager by clicking on Causes from the left side menu, then selecting Nonprofit Eligibility:
2. Click on Add Inclusions.
3. Search for the nonprofit you would like to include OR upload a CSV of nonprofit EINs that you'd like include in giving
- The CSV should contain a single column with the nonprofit EINs you'd like to exclude. One EIN per row, no headers on the column

4. Click Confirm Selection if you used the search feature to find your nonprofit. If you uploaded a CSV, the nonprofits will be saved upon successful upload.
5. And you're all set! The nonprofits visible in your list are the only ones you and your shoppers will be able to support.
This means that when you visit your Global Settings page or PLCD page and click Add Causes, only the nonprofits you included will be visible in your search results. We have a helpful message indicating as such if you search for a nonprofit not in your included list.
An important note: If you switch from Inclusions to Exclusions OR Exclusion to Inclusions at any point, all of the causes in the list your abandoning will be wiped from the respective list. We will trigger a warning modal for you to confirm this before you proceed